DIY Kombucha
Your quick and easy guide to DIY Kombucha is here!
********
Share this DIY Kombucha Image On Your Site
********
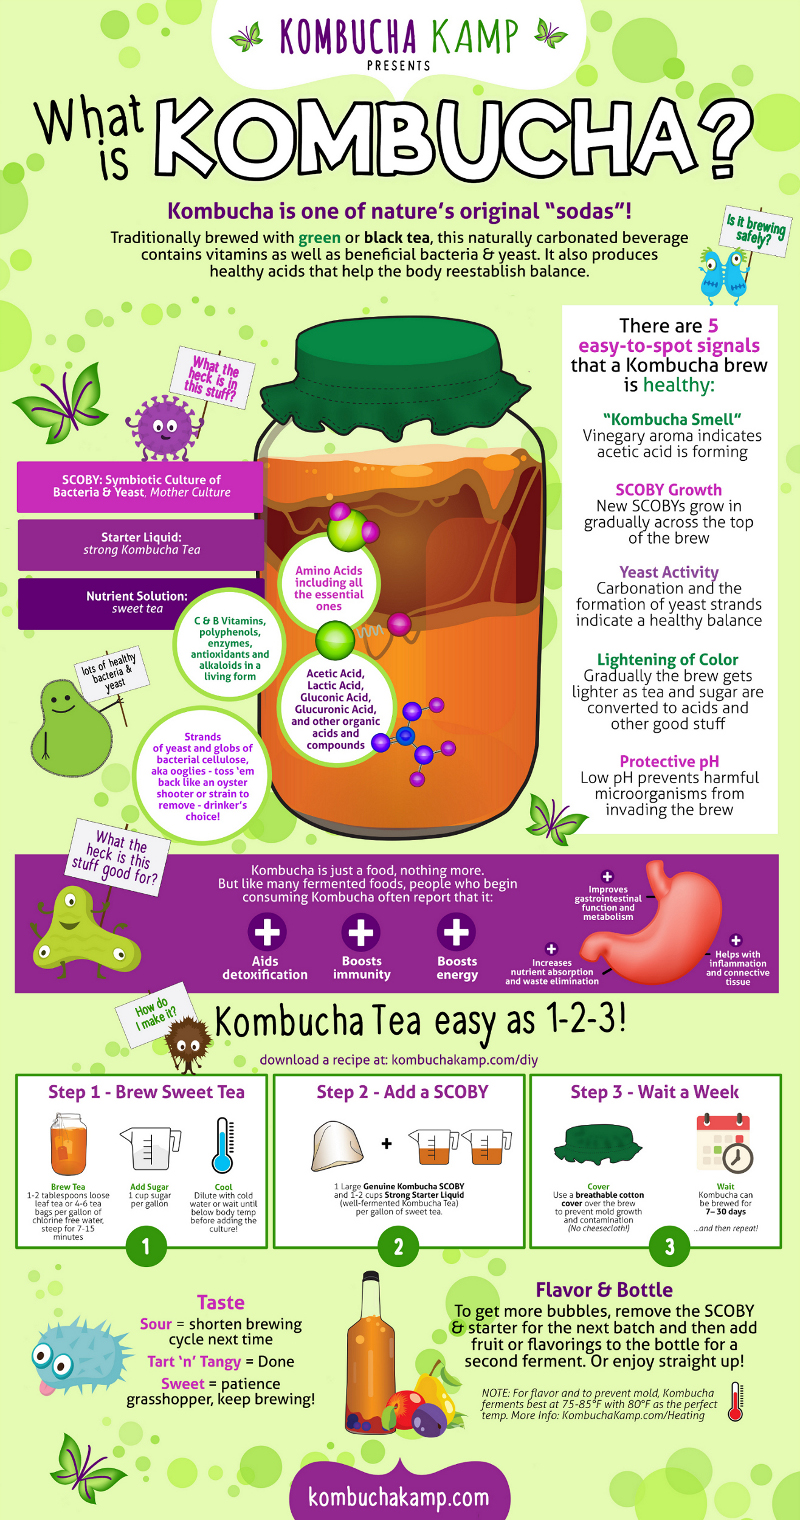
What’s in Kombucha?
Kombucha is one of nature’s original “sodas”!
Traditionally brewed with green or black tea, this naturally carbonated beverage contains vitamins as well as beneficial bacteria and yeast. It also produces healthy acids that help the body reestablish balance.
There are 5 easy-to-spot signals that a Kombucha brew is healthy:
1. “Kombucha Smell”
Vinegary aroma indicates acetic acid is forming
2. SCOBY Growth
New SCOBYs grow in gradually across the top of the brew
3. Yeast Activity
Carbonation and the formation of yeast strands indicate a healthy balance
4. Lightening of Color
Gradually the brew gets lighter as the tea and sugar are converted to acids and other good stuff
5. Protective pH
Low pH prevents harmful microorganisms from invading the brew
What the Heck is in This Stuff?
- SCOBY – Symbiotic culture of bacteria and yeast, mother culture
- Strong Starter Liquid – Well Fermented Kombucha tea
- Nutrient Solution – Sweet tea
- Lots of healthy bacteria and yeast
- Amino acids, including all the essential ones
- C and B vitamins, polyphenols, enzymes, antioxidants, and alkaloids in a living form
- Acetic acid, lactic acid, gluconic acid, glucuronic acid, and other organic acids and compounds
- Strands of yeast and globs of bacterial cellulose – aka ooglies – toss ‘em back like an oyster shooter or strain to remove – drinker’s choice!
What the Heck is this Stuff Good For?
Kombucha is just a food, nothing more. But like many fermented foods, people who begin consuming Kombucha often report that it:
- Aids detoxification
- Boosts immunity
- Boosts energy
- Improves gastrointestinal function and metabolism
- Increases nutrient absorption and waste elimination
- Helps with inflammation and connective tissue
————————————–
DIY Kombucha Instructions
Although it seems complicated, making DIY Kombucha at home is actually really simple! You start by brewing tea, and then add sugar, SCOBY, and starter liquid. Then let nature do the rest!
The Golden Rules of Making Your Own Batch Brew DIY Kombucha
Although making Kombucha really is simple, know these rules:
Never:
- Use a refrigerated SCOBY
- Use a dehydrated SCOBY
- Try to grow your own SCOBY from a store-bought bottle of Kombucha that has been flavored, filtered or reformulated, pasteurized, or that comes with a label that says anything less than “100% Kombucha”
- Use or consume SCOBY or Kombucha with mold growth (see more below)
Always:
- Use a fresh, healthy SCOBY that has grown to full size, plus plenty of strong starter liquid from the top of the brew or Hotel, to start a new batch of Kombucha
- Brew away from direct sunlight (regular ambient light is okay)
- Store your SCOBY Hotel in a dry, dark place (like a cabinet)
- Keep your Kombucha Brew or Hotel covered with a tightly woven cotton cloth–not cheesecloth–and a tight rubber band to keep contamination like mold or fruit flies out
- Share fresh “baby” SCOBYs with 1-2 cups of strong starter liquid (mature Kombucha Tea) along with very clear, thorough instructions for how to brew kombucha. If you aren’t able to, recommend a reputable source—like Kombucha Kamp!
Supplies
- Brewing vessel or jar – 1 gallon or larger
- Kettle or pot to boil water
- Cloth cover with rubber band or brewing cap
Ingredients
- Filtered, Chlorine-Free Water
- Black, green, or white tea—or experiment with blends including herbal. We highly suggest Hannah’s Special Tea Blend, which is organic
- Sugar–most commonly used is evaporated cane juice but many types of sugar will work for brewing Kombucha.
- Full Size, Fresh Kombucha SCOBY
- Strong Starter Liquid (well-fermented Kombucha)
Batch Brewing One Gallon of Kombucha Tea – Easy as 1-2-3!
Now that you know the golden rules and have your supplies and ingredients prepared, it’s time to get to the fun part.
Step 1 – Brew Sweet Tea
- Brew Tea
Use 1-2 tablespoons of loose leaf tea or 4-6 tea bags per gallon. Use filtered, chlorine-free water. Steep for 7-15 minutes. - Add Sugar
Use 1 cup of sugar per gallon of tea. - Cool
Dilute your sweet tea with cool water (use less water in the initial brewing process if using this method so that you still come out to a gallon) or wait until the sweet tea cools to below body temperature before adding the culture to avoid harming the bacteria or yeast with too much heat.
Step 2 – Add a SCOBY
- Add 1 large genuine Kombucha SCOBY along with 1-2 cups of strong starter liquid per gallon of sweet tea.
- Cover
Use a breathable cotton cover over the brew to prevent mold growth and contamination (no cheesecloth!).
Step 3 – Wait a Week
- Kombucha can be brewed for 7-30 days…and then repeat! Each batch is different and conditions vary. Only your taste buds can tell you when the brew is ready, so after 7 days, taste regularly until it reaches the flavor you like. Then start the process again when you’re ready for another batch!
When is Your Kombucha Tea Ready to Drink?
Taste your Kombucha once a week to see if it’s ready.
- Sour = Shorten brewing cycle next time.
- Tart ‘n’ Tangy = Done.
- Sweet = Patience grasshopper, keep brewing!
Flavor & Bottle
If your Kombucha isn’t bubbly enough, first remove the SCOBY and starter liquid for the next batch, and then add fruit or flavorings to the bottles prior to filling them for a second ferment. Or simply enjoy it straight up!
Need some help or some inspiration for brewing Kombucha at home? Check out these helpful articles on brewing your own Kombucha tea:
Mold
Think you have found mold growing? Usually what is mistaken for mold is normal but strange looking SCOBY or yeast growth. Mold on Kombucha looks much like mold on bread or other food: it is always dry and fuzzy and sitting on top of the culture, usually in circles and colored white, black or green. Brown yeast strands can float in the liquid or embed in the culture, causing dark spots of SCOBY that may look unusual, but unless these spots are dry and fuzzy, they are unlikely to be a problem.
See the Kombucha Kamp Mold Gallery here for more information.
If you truly do have mold, it is recommended to throw out the whole thing. Mold growth is very unlikely in good conditions, but if it does the most likely culprits are weak SCOBYs/starter liquid or low temperatures.
- Note: For ideal flavor and to prevent mold, Kombucha ferments best at 75-85°F with 78-80°F as the perfect temperature. Find more information on temperature at: www.kombuchakamp.com/heating
Learn About DIY Kombucha
- What is Kombucha? Kombucha is a fizzy drink made with black tea and sugar, which is fermented as all the healthy bacteria and yeast in the SCOBY and Starter Liquid feed on the sugary mixture. Learn more about what Kombucha is here.
- What is a SCOBY? A “Symbiotic Culture Of Bacteria and Yeast” is a pellicle of bacterial cellulose. It is home to the healthy bacteria and yeast, which are responsible for fermenting your tea.
- What are the benefits of Kombucha? One of the best things about Kombucha is that it is fermented. Fermented foods and drinks like Kombucha help to keep your gut healthy, which is surprisingly linked to the rest of your health. Learn more about the benefits of Kombucha.
- What’s are some other fermented drinks? Kombucha is one of several fermented drink options. JUN tea, milk kefir, and water kefir are all fermented drinks to try.
Continuous Brewing
- What is continuous brewing? Continuous brewing is the most versatile brewing method and makes use of a larger vessel (2-5 gallons) with a spigot. With continuous brewing, you make one large batch of kombucha, and when it’s ready, easily decant no more than 1/3 of it into bottles or simply pour yourself a fresh serving anytime. The SCOBY and mature kombucha remain in the vessel, so all you have to do to keep the brew going is replenish what you harvest with more sweet tea. Learn more about continuous brewing.
- Continuous Brewing vs. Batch Method – Batch brewing works great too, but the continuous brewing method comes with several additional benefits. It is the safest method as the risk of mold and contamination is greatly reduced. Cleanup, maintenance, and access to the brew are also much easier. Because of the stronger ratio of starter liquid that remains in the vessel after the first batch, you can brew more kombucha in just 2-5 days. With the batch brewing method, you have to start the whole process over again. Continuous brewing also saves money! Not only is this method more efficient overall, it also lends itself to the best flavor (in our opinion) and allows healthier acids to develop over time—ones that don’t have the opportunity to develop with batch brewing.
Brewing Kombucha at Home
Check out these links to more great Kombucha resources:
- How-to Videos
- Kombucha Recipes
- How to Flavor Kombucha
- How to Store Kombucha SCOBY
- Bottling Homemade Kombucha
- Frequently Asked Questions (FAQs)
Don’t forget to download our DIY Kombucha tea guide and sign up for our newsletter!


