SCOBYs Are Taking Over!
How to Properly Select & Trim SCOBYs for Brew Quality and Balance
Ever see that episode of Star Trek “The Trouble with Tribbles?” Perhaps your personal SCOBYs portray this particular penchant for prolifically producing to the point of preposterousness? With Kombucha, it’s a good problem to have. It means a healthy Kombucha brew, but oh boy if we don’t trim SCOBYs they can get out of control!
While it is true that SCOBYs have a near indefinite potential for lifespan, they also can grow weaker over time due to bad practices or neglect. Instead, follow these simple tips to learn how to choose the healthiest SCOBYs to keep in your brew or SCOBY Hotel, and how to trim SCOBYs as needed for long term brewing success.
What is a SCOBY? Quick Refresher Course
SCOBY stands for “Symbiotic Culture of Bacteria and Yeast.” Symbiosis means the bacteria and yeast work together to create Kombucha. Yeast start the process by breaking down table sugar (sucrose) into simple sugars (fructose and glucose), plus a little ethanol and some acids.
The bacteria then consume the ethanol and simple sugars, using them as fuel to create organic acids such as gluconic, glucuronic, acetic and others. They also use the nutrients to create strands of bacterial cellulose, which they weave together to create the SCOBY in layers. The yeast and bacteria live in the SCOBY (on separate “floors”) as well as in the liquid itself, and continue to work together throughout the brewing process. Each organism relies on the other.
Symbiosis also depends on balance. While key to fermentation, yeast are more prolific and reproduce well under more varied conditions. Given the chance, they will overrun the brew! For success over time, we must rein in the yeast and nurture the bacteria to maintain equilibrium. Using proper starter liquid (always taken from the top of the previous brew or Hotel), selected/trimmed SCOBYs, and recommended temperature ranges provides the best conditions for the bacteria to thrive. More about the SCOBY here.
Why Do SCOBYs Need Trimming?
Given nutrients and good conditions, SCOBYs are always reproducing. Any SCOBY that grows on top of a hotel or a neglected brew will continue to thicken until disturbed. In some cases, all or nearly all the liquid in a Hotel will be consumed by the cultures, leaving behind layers and layers of very thick SCOBY. Reducing the amount of culture is paramount to maintaining a healthy Hotel. (for more management tips, visit the SCOBY Hotel Maintenance post here)

Watch out, SCOBYs will reproduce like Tribbles if we don’t trim and discard some!
Or if you are using the Continuous Brew Kombucha method, eventually, generally every 2-6 months, it will be time for a re-set. As you will discover, the SCOBYs have been hard at work in the vessel, reproducing and usually fusing together in many layers. This can result in a massive Mothership SCOBY! If we then trim SCOBYs before starting again, we achieve multiple goals: removing weaker bottom layers, separating the thickest and strongest portions, as well as cutting down the amount of SCOBY present in the vessel so more Kombucha can be brewed! (more info in the Continuous Brew FAQ here)
Even SCOBYs formed in the Batch Brew method may benefit from a little trim before being tossed into the next round. And if the culture grows too thick, fresh oxygen cannot reach the liquid below. If you find that the new layers of SCOBY have fused to the top of the old layer, you could choose to pull or cut them apart to use the same amount of culture batch to batch. And even the best SCOBY can use a little clean up on the edges from time to time. Click here of you are not sure about Batch Brew vs Continuous Brew.
********
Myth Busting – Kombucha SCOBYs and Metal Scissors or a Knife?
While it is true that Stainless Steel is the only safe metal for brewing Kombucha, it is not dangerous for the SCOBYs to come in brief contact with any metal while trimming (most kitchen scissors and knives are stainless steel anyway). The short amount of time is not enough to allow the anything to leach into the cultures. Learn more about selecting safe vessels and supplies for Kombucha.
Perpetuate the Strongest Culture – But Don’t Throw Too Much Away!
Just as a farmer saves the seeds from the best plants, so too do we need to observe and care for our cultures so they provide the healthiest brew possible. However, keep in mind that some SCOBY is better than none! This means that if all you have at this time is weaker culture, but the resulting brews are mold free and taste delicious, there is no need to discard the SCOBY you have. Only if you have too much should you get rid of extra SCOBYs that continue to brew well.
HOW TO IDENTIFY STRONG CULTURE
- Strong new SCOBY growth is white and creamy in appearance.
- Healthy culture has a density and firmness that makes it difficult to rip or tear. It may form with darker coloration underneath and often has strands of yeast clinging to the bottom.
- The edges of strong SCOBYs are well formed and maintain their shape batch to batch.
- Healthy new SCOBY layers could be thick or thin. This depends on many factors including how long the batch has been brewing, the temperature, the type of tea used, the sugar source, as well as the strength of the starter liquid.
HOW TO IDENTIFY WEAK CULTURE
- SCOBY that is weaker may appear translucent or have some odd discoloration. Discard SCOBYs that rip or tear easily.
- Thick cultures can still be weak. To test it, pinch the SCOBY between the thumb and forefinger; if it easily presses through, the culture can be let go.
- Sometimes weak culture can be attached to strong culture. It should be easy to peel the weak layers off the strong SCOBY.
- It is normal for yeast to sometimes be embedded in the culture. This can even create holes or other strange shaped formations. As long as the culture is strong, sections of yeast are not a problem. To determine the difference between yeast and mold, visit the Kombucha Mold Galleries here.
- Weak culture can be used in a pinch but over time, the brew may also grow weaker in flavor, or potentially lead to mold.
- Sometimes weak culture is only present on a portion of the SCOBY. In these cases, it can usually be removed by simply pinching or using one’s fingers.
*NOTE: KKamp does not recommend rinsing the cultures as that removes too much of the yeast. Instead, pinch off large yeast globs (they look brown, black or sometimes green) after removing the SCOBY to keep it in balance.”
![]() KMamma Sez: If you can’t grow a thick new culture on a batch brew before it gets sour, consider using your Hotel to create more SCOBY. Collecting the thin cultures that have formed with each batch will make your SCOBY Hotel nice and strong over time. Once you have a thriving and well fermented Hotel, add just a few cups of sweet tea and leave it undisturbed for at least a couple of weeks. A thick new baby should form across the top of the Hotel!
KMamma Sez: If you can’t grow a thick new culture on a batch brew before it gets sour, consider using your Hotel to create more SCOBY. Collecting the thin cultures that have formed with each batch will make your SCOBY Hotel nice and strong over time. Once you have a thriving and well fermented Hotel, add just a few cups of sweet tea and leave it undisturbed for at least a couple of weeks. A thick new baby should form across the top of the Hotel!
********

Photography by © Matt Armendariz, from The Big Book of Kombucha, © by Hannah Crum and Alex M. LaGory, used with permission from Storey Publishing.
How To Trim SCOBYs
- As always, start with a clean space. Wiping down counters and curing the scissors or knife with either Kombucha vinegar or a distilled vinegar is recommended to prevent mold or other contamination.
- If you have a very large culture or cultures, especially if many layers have grown together, it’s best to remove them from the hotel into a separate large bowl or vessel.
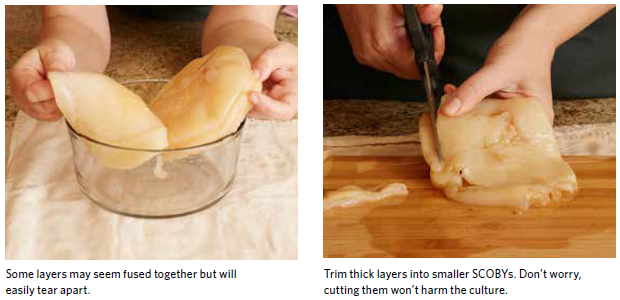
- First, see if it’s possible to simply pull the layers of SCOBY apart with your hands. If it formed in thin layers, they may peel easily or even rip at times but you cannot hurt the SCOBY this way.
- If you cannot rip it apart, trim SCOBYs using the scissors or knife. How you cut it does not matter: half, quarters or to trim around the edges to reduce the size.
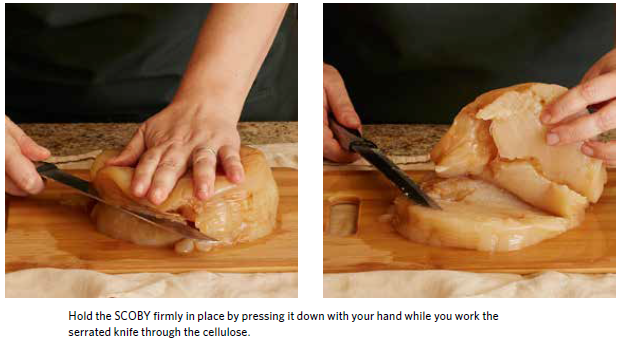
- Or if you have a very thick layer of SCOBY that you would like to slice horizontally:
- Place the culture on a cutting board or plate that is large enough to capture any runoff liquid as well as the pieces.
- In some cases, a towel placed underneath is helpful to prevent sliding and catch excess drips.
- Firmly press down on the culture with one hand or a towel to keep in place and then apply the knife at the desired thickness.
- Using a back and forth motion, saw the culture into two layers like a bread roll.
- Discard any soft, gelatinous edges or unwelcome bits as needed.

Photography by © Matt Armendariz, from The Big Book of Kombucha, © by Hannah Crum and Alex M. LaGory, used with permission from Storey Publishing.
********
BONUS: Mid-Fermentation SCOBY Maintenance
We often ferment Kombucha for weeks at a time, and it’s usually best to leave the brew alone until it’s ready. However, there are times when a little mid-fermentation maintenance is required for best results.
SCOBY LIFTING UP
Every once in awhile, due to an abundance of CO2 created by the brew, you may find the SCOBY is starting to lift up from the surface of the liquid in one section of the brew. Sometimes it even lifts the entire SCOBY out of the liquid, suspended in mid air! You may also notice a yeast “umbilical cord” connecting it to the liquid. There’s nothing “wrong” with this as long as the culture doesn’t dry out in the meantime.
However, if the cloth cover gets wet or the brew is somehow exposed by the lifting SCOBY, fruit flies could contaminate the brew. No worries if you find the SCOBY has lifted out. It’s easy to fix, simply remove the cover and gently push the SCOBY until the air releases and it falls back into the liquid (it might splash!).
DRIED OUT BUBBLE
Especially in low-humidity brewing environments, sometimes a bubble or bubbles of cellulose will form on the surface of the culture. If they are large and happen to dry out, they can become a landing spot for mold. The Kombucha SCOBY’s anti mold properties are due to the low pH and organic acid profile of the liquid.
If you notice one of these bubbles, pop or cut it with clean scissors or a knife. Or you can always push the whole culture back into the liquid. Of course anytime we disturb the top layer, a new one will start to form, which is perfectly fine.
********
Now that you are ready to trim SCOBYs anytime, check out these links to more great Kombucha resources:
- Selecting the Ideal Spot for Kombucha, Kefir, JUN and other Ferments
- Kombucha Recipes
- Continuous Brew Kombucha FAQ
- How to Flavor Kombucha
- How to Store Kombucha SCOBY
- Bottling Homemade Kombucha
- Frequently Asked Questions (FAQs)
Don’t forget to download our DIY Kombucha tea guide and sign up for our newsletter!

